
- Lengthen guarantee
- Get pleasure from 1 on 1 knowledgeable service
- Get the product expertise officer alternative
INTRODUCTION
Thanks for selecting the PARD FD1 evening imaginative and prescient entrance clip-on collection. Please learn this handbook rigorously earlier than utilizing the machine to make sure correct and secure operation. Please hold this handbook in a secure place for future reference. It supplies step-by-step directions for utilizing your evening imaginative and prescient scope. This handbook is for reference functions solely and could also be topic to updates ithout prior discover. For the most recent info, lease go to PARD’s official web site. PARD reserves the ultimate proper to interpret this handbook.
PRECAUTIONS
- Battery Utilization: Please take away the insulating tape from the battery earlier than first use. Use a completely charged lithiumion battery with a voltage score of three.7V
- Gadget Storage: Flip off the machine and take away the attery if not use for greater than 10 days. Retailer the machine & battery in a dry and secure place.
- Dealing with and Transportation: Train warning when dealing with or transportation the machine. It is strongly recommended to make use of the unique packaging for transportation.
- Mild Publicity: Don’t use the machine to focus immediately on sturdy sources of sunshine such because the solar or electrical welding. Direct publicity could injury the detector and void the guarantee.
- Lens Safety: Forestall lens scratches and injury from oil or chemical contamination. Preserve the lens cap on when not in use.
- Environmental Issues: Place the machine in a cool, dry, and well-ventilated surroundings. Keep away from sturdy electromagnetic fields. Make sure the storage temperature stays between -20℃/-4℉ and 50℃/122℉.
- Gadget Disassembly and Assist: Please chorus from making an attempt to disassemble the machine with out correct authorization. Unauthorized disassembly can lead to voiding the guarantee and should trigger irreparable injury to the machine. In the event you encounter any issues, please ontact our after-sales staff. Report any points promptly to make sure well timed decision and correct assist.
- Consideration! Export Necessities: Please notice that each one PARD night-vision and thermal imaging gadgets require a license for export outdoors the nation.
PACKAGE CONTENTS
DESCRIPTION & KEY FEATURES
FD1-LRF is a compact, light-weight multifunctional digital evening imaginative and prescient clip-on that may be hooked up to present your scope. Its low-illumination and high-sensitivity sensor allow hunters to successfully lengthen their searching hours nicely into the evening. Moreover, the machine can be used as a handheld monocular or a mounted scope. Mixed a 1200yd LRF module, it allows exact ranging for correct ballistic calculations and exact hits on targets. With its spectacular 6000J affect resistance and IP67 safety score, it ensures sturdiness and dependable efficiency. Outfitted with a chargeable 18650 lithium battery, it provides comfort, ease of use, and long-lasting operation.
Key options
- Multipurpose for being a entrance clip-on, monocular or evening imaginative and prescient scope.
- No have to be zero (as a clip-on)
- Fast conversion of optical scope to nighttime imaginative and prescient scope CMOS Picture Senso.
- CMOS Picture Sensor
- Ballistic calculator (as Scope)
- 1200yd/1000m LRF
- Seen Mild Enhancement Algorithm (VLEA)
- Adjustable beam IR illuminator with a spread of 350m.
- Recoil-activated recording.
- Upgraded UI design.
- WiFi
- IP67 weatherproof score.
- 6000J recoil resistance
SPECIFICATIONS
| Classification | Digital Evening Imaginative and prescient Entrance Clip-on | |
| Goal | Scope/Monocular | Clip-on |
| Sensor | ||
| Kind | CMOS | CMOS |
| Decision(pixel) | 1920*1080 | 1920*1080 |
| Pixel Measurement(µm) | 2.9 | 2.9 |
| Body Price(Hz) | Colour:60/B&W:30 | Colour:60/B&W:30 |
| Picture Engine | Picture Engine PARD VLEA | Picture Engine PARD VLEA |
| Optics | ||
| Goal Lens(mm) | 30 | 30 |
| Optical Magnification(x) | 3.5 | 1 |
| Digital Zoom(x) | 2 | N/A |
| Subject of view (HxV) – Horizontal | 7.9° | 7.9° |
| Subject of view (HxV) – Vertical | 5.9° | 5.9° |
| Subject of view (HxV)-Diagonal | 9.9° | 9.9° |
| Eye Reduction(mm) | 30 | N/A |
| Diopter adjustment | 5D~+5D | N/A |
| Show | ||
| Kind | OLED | OLED |
| Decision(pixel) | 1440*1080 | 1440*1080 |
| Reticle Fashion | 6 | 6 |
| Reticle Colour | Crimson/White/Yellow/Inexperienced | N/A |
| Picture Mode | Colour /Mono | Colour /Mono |
| Photograph / Video | ||
| Photograph Decision(pixel) | 2592*1944 | 2592*1944 |
| Photograph Format | .JPG | .JPG |
| Video Decision(pixel) | 1440*1080 | 1440*1080 |
| Video Format | .mp4 | .mp4 |
| Storage | Micro SD card(128 GB, Max) | Micro SD card(128 GB, Max) |
| Predominant operate | ||
| LRF Detection Vary | 1000m/1200yd | 1000m/1200yd |
| Ballistic Calculator | Sure | N/A |
| PIP | Sure | N/A |
| Self-motivated Recording | Sure | Sure |
| Loop Recording | Sure | Sure |
| Microphone | Sure | Sure |
| IR Wavelength(nm) | 850/940 | 850/940 |
| IR Illuminating Stage | 3 Ranges | 3 Ranges |
| Connections | ||
| USB Tpye-C | Sure | Sure |
| WiFi | Sure | Sure |
| Supported Apps | PardVision | PardVision |
| Energy Provide | ||
| Battery Kind | Lithium-ion 18650 | Lithium-ion 18650 |
| Output Voltage(V) | 3.7 | 3.7 |
| Working Time(h) | ≤8 | ≤8 |
| Exterior Energy Provide | Kind-C | Kind-C |
| Materials | ||
| Housing | Aluminum Alloy | Aluminum Alloy |
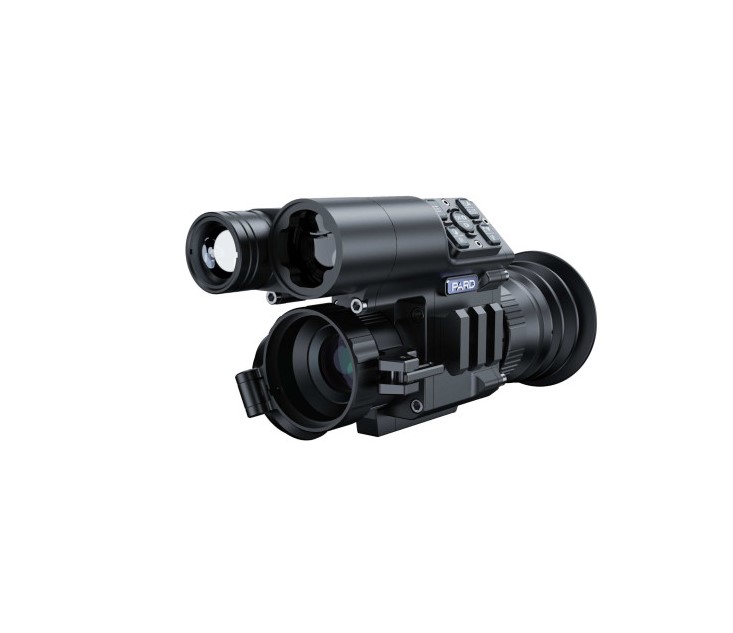
COMPONENTS
FD1-LRF
| No. | Title | No | Title |
| 1 | Energy indicator | 7 | Ringefinder (LRF) |
| 2 | Keypad | 8 | Goal lens cap |
| 3 | Battery compartment cap | 9 | Goal lens |
| 4 | Clip-on eyepiece | 10 | Micro SD card slot |
| 5 | Picatinny rail | 11 | Kind-C charging port |
| 6 | Adjustable beam IR illuminator | 12 | Energy/Sleep button |
INSTALLATION
1. Unboxing
Earlier than utilizing this machine, please observe these steps:
- Open the field and punctiliously take away the machine.
- Confirm that each one objects listed within the bundle contents are included within the field.
- Examine the machine for any indicators of harm to the show, physique, lens, buttons, and different parts.
- Be certain that the target lens and eyepiece are clear and in correct working situation. Notice: In the event you discover any equipment lacking or broken, please contact our after-sales service for help.
2. Battery Set up and Startup
Please following the steps beneath for battery set up:
(1) Flip the battery cap ounterclockwise to open it and take away the battery.
(2) Take away the insulating tape from the battery.

Fig.2
Insert the battery with the optimistic pole (+)
dealing with inward, then rotate the battery cap
clockwise till it’s tightly locked in place.

Fig.3
To energy on the machine, press and maintain the facility button for about 3 seconds. The machine is prepared to be used when the facility indicator illuminates and the PARD Emblem seems on the display.
Notice:
- Use a single 18650 rechargeable lithium-ion battery with a voltage score 3.7V;
- Don’t expose the battery pack to excessive temperature or to a unadorned flame.
- Don’t put the machine into water when the battery cowl is open;
- Don’t expose disassemble the machine with out uthorization;
- Don’t pierce the machine with sharp objects;
- Battery needs to be stored out of attain of kids, and the optimistic and detrimental terminals of the battery needs to be put in accurately;
- While charging the battery don’t depart the battery nattended.
- When utilizing the battery at chilly(low) temperatures, the attery capability decreases, that is regular and never a defect.
- Don’t use the battery if it has been broken in any method.
- After charging is full don’t depart the battery on cost linked to the community.
 Please act responsibly and recycle or get rid of all used batteries in accordance with the regulation.
3. Adapter Set up
To make sure optimum efficiency and person expertise, we extremely advocate utilizing our unique adapter offered within the product packaging as proven in Fig. 6. The adapter set up steps are as follows:
- Take away the digital evening imaginative and prescient machine, adapter, gaskets and Allen wrench from the field.
- Apply 1-2 layers of insulating tape to guard the scope’s goal lens.
- Connect and rotate the clip-on eyepiece onto the digital evening imaginative and prescient physique.
- Align the clip-on eyepiece with the adapter’s interior recess, then safe it to the evening imaginative and prescient machine utilizing the pin with knurled thumbnut.
- Select the suitable gasket(s) to your scope’s goal bell diameter. Connect the assembled machine to the scope’s goal bell, making certain the show is centered via your scope’s eyepiece. Safe by decreasing and tightening the adapter locking lever.
4. Focusing
Diopter Adjustment Ring
Diopter adjustment in an evening imaginative and prescient machine refers back to the capability to regulate the main target of the machine’s eyepiece to compensate for variations in customers’ imaginative and prescient. It permits people with various ranges of eyesight to realize a transparent and targeted view of the displayed content material on the machine’s display.
- After turning on the machine, rotate the diopter adjustment ring till the texts or icons on the display are clearly.
- Please notice that the picture will not be clear after diopter adjustment. So long as the textual content on the display is obvious and visual, it’s adequate.
Notice: If the target lens just isn’t correctly targeted, the picture could also be unclear.
Goal Lens Adjustment Ring
- Earlier than adjusting the target lens, it is very important full the diopter focusing.
- Then regulate the target lens focus ring till a transparent picture of the goal is achieved.
5. E-compass Calibration
As soon as the eyepiece is correctly targeted, proceed to calibrate the digital compass utilizing the “Determine 8” sample methodology. Tilt and transfer the machine in a Determine 8 movement till the compass is calibrated, as indicated in Fig. 7.
6. Zeroing
Reticle adjustment refers to aligning the reticle with the purpose of affect at a particular zeroing distance. This ensures that the aiming level coincides with the precise level of affect at that distance.
Interface Clarification
- The primary merchandise “RTZ” means that you can save the present setting profile. It can save you as much as 5 units of information (A-E);
- The second merchandise “X” represents the X axis of the cross line.
- The third merchandise “Y” represents the Y axis of the cross line
- Fashion corresponds to the crosshair kind (7 choices obtainable).
- Colour corresponds to the colour of the cross line crimson/white/yellow/inexperienced).
- Beneath the Save choice, “Y” signifies to avoid wasting the adjustments, and “N” signifies to not save them.
Zeroing Steps
Notice: Guarantee correct set up earlier than zeroing the FD1/FD1-LRF. Please observe these steps to zero your machine:
- Set the goal: Set the goal at zeroing distance and make sure that the machine supplies a transparent picture of the goal.
- Enter the reticle adjustment (Zeroing web page): From the house display, press [Key 5] to entry the menu. Then press [Key 2] to pick out the reticle adjustment choice as proven in Fig. 9. Press [Key 3] to enter the sub-menu nterface.

Fig. 9
3. Profile setting: As soon as on the zeroing web page, press [Key 2] or [Key 4] in RTZ merchandise to create a brand new zeroing profile or edit an present one (Fig. 10).
4.Shoot: Hearth a shot on the heart of the goal (A) and make sure that the purpose of affect(B) is clearly seen on the display as proven in Fig. 11.
5. Alter zero worth: press [Key 3] to maneuver the cursor to the “X” merchandise, click on [Key 2] or [key 4] to freeze the display. Press [Key 2] or [Key 4] once more to regulate the worth of “X”. Equally, transfer the cursor to the “Y” merchandise by urgent [Key 3], and regulate the worth of “Y” with [Key 2] or [Key 4] till the middle level of the reticle (A) aligns with the purpose of affect (B) on the show display;
6. Save and exit: Press [Key 3] to the “Save” merchandise, use [Key 4]/ [Key 2] to decide on “Save:Y”/”Save:N”, then press [Key3] to onfirm. Alternatively, press and maintain [Key 3] to avoid wasting and exit. The middle level of the reticle(A) will now align with the purpose of mpact(B).
OPERATION INSTRUCTION
Interface
Fig. 12
Shortcut Mode
| Keypad | Single press | Press and maintain | Double press |
| 1 | Energy/Sleep button | Energy on/off | – |
| 2 | LRF on/ Ballistic Calculator/Down key | Disable WiFi | – |
| 3 | OK/Take picture | Report Video/Save | – |
| 4 | Up key/Zoom in | Browse recordsdata | Open/Shut PIP |
| 5 | Menu/Play again | Play again | |
| 6 | Brightness of IR (Black&White mode) |
Swap between black&white/shade mode |
Notice: All operations of the FD1 are the identical because the FD1-LRF, with the one distinction being that the FD1-LRF is provided with a built-in rangefinder module.
Clarification:
Key 1 (Energy key):
- Single press:
Click on it to enter sleep mode, and click on once more to exit sleep mode; - Press and maintain: Press and maintain the facility button for 3 seconds to energy on/off the machine;
Key 2:
- Single press:
1 When the ballistic calculation operate is turned off, press [key 2] to activate the LRF operate (For the LRF model, the gap can be measured and displayed mechanically). For the non- RF model, the gap is not going to be measured mechanically and can show “[0]m or [0]yds”. You possibly can manually enter the goal distance worth by urgent [Key 2] or [Key 4]. Press [key 2] to deactivate the vary indicator.
When the ballistic calculation operate is enabled, press [key 2] to energetic the LRF operate (For the LRF model, the gap can be measured and displayed mechanically). For the non-LRF model, the gap is not going to be measured mechanically and can show “[0]m” or “[0]yds”. You possibly can manually enter the goal distance worth by urgent [Key 2] or [Key 4]. Press [key 2] once more to allow the ballistic calculation operate and point out the affect level. Press [key 2] to exit the ballistic calculation operate interface.
2 Menu mode: single press it to will increase worth or navigate ahead via choices;
2. Press and maintain:
press and maintain [Key 2] to toggle WiFi on/off.
Key 3:
- Single press:
1 Dwelling display mode: press [Key 3] to take picture;
2 Within the menu mode: press [Key 3] to substantiate your choice.
2. Press and maintain:
Dwelling display mode: press and maintain [Key 3] to start out video recording (with Micro SD card inserted), and lengthy press [key 3] once more to avoid wasting the video and exit
Key 4:
1.Single press
In Black&White mode, with the IR illuminator turned on, press [Key 3] to regulate the brightness stage of the IR illuminator. Every press will cycle via the next choices: Off – 1 Stage – 2 Stage – 3 Stage – Off
2. Press and maintain:
-When the WiFi operate is turned off, press and maintain [key 4] to entry the video recordsdata interface;
a) Within the video recordsdata interface, press [Key 2] or [Key 4] to modify the video file;
b) Press [Key 3] to play or pause the video;
c) Whereas enjoying the video, urgent [Key 2] or [Key 4] will assist you to quick ahead or rewind at 2x, 4x, or 8x pace;
d) Press [Key 5] to return to the video file interface, after which press [Key 5] once more to entry the next setting.
1)Delete:
- Delete Present
- Delete All
2)Shield:
- Lock Present
- Unlock Present
- Lock All
- Unlock All
3)Slide Present:
- 2 seconds
- 5 seconds
- 8 seconds
Notice: press [Key 2]/[Key 4] to toggle via these settings and use [Key 3] to substantiate your choice:
e) Press [Key 5] to exit the above settings and return to the ideo file interface;
f) Then, press and maintain [Key 5] to exit the video recordsdata interface and return to the house display.
3. Double press
Dwelling display mode: double press [Key 4] to toggle the PIP operate on/off.
Key 5:
- Single press:
- Dwelling display mode: press [Key 5] to open the menu, press [Key 5] once more to shut the menu.
- menu mode: press [Key 5] to return to dwelling display mode
- Press and maintain:
- Dwelling display mode: press and maintain [Key 5] to return to dwelling display mode.
Key 6:
- Single press:
In Black&White mode, with the IR illuminator turned on, press [Key 6] to regulate the brightness stage of the IR illuminator. Every press will cycle via the next choices: Off – 1 Stage – 2 Stage – 3 Stage – Off.
2. Press and maintain:
Dwelling display mode: press and maintain [Key 6] to toggle between Black&White and Colour mode.
Features
Dwelling display mode: press [key 5] to enter the menu mode, the place you may set varied operate choices throughout the menu bar. Please notice that the shortcut key operate is disabled on this mode (Fig. 14).
Fig. 14
1. Show Brightness
This operate means that you can regulate the brightness of the display
- Press [Key 2] to show brightness choice. Press [Key 3] to enter the sub-menu interface.
- Choose “0”, “Stage 1″, “Stage 2”, “Stage 3”, “Stage 4”, “Stage 5”, or “Stage 6” by urgent [Key 2]/[Key 4].
2. Ballistic calculator
The ballistic calculator is designed to calculate bullet rajectories and supply exact aiming factors, making certain correct shot placement. With assist for as much as 5 profiles, customers can make the most of the scope throughout a number of searching instruments.
- Dwelling display mode: press [Key 2] to entry the ballistic calculator choice. Press [Key 3] to enter the sub-menu interface.
- Use [key 2] or [Key 4] to navigate and choose both “Parameters” or “On/Off” after which press [Key 2] to avoid wasting your choice or enter the Parameters choice.
- Adjusting Ballistic Calculator Parameters: as soon as contained in the ballistic calculator parameters sub-menu, press [Key 3] to scroll up or down and find the specified parameter. press [Key 2] or [Key 4] to regulate the worth of the corresponding parameter. Notice: For the parameter settings, please check with the official web site.
3. Vary Unit Choice
Customers can simply swap between “meter” or “yard” because the vary to fulfill their desire.
- Press [Key 2]/[Key 4] to entry the vary unit choice ption. Press [Key 3] to enter the sub-menu interface.
- Use [Key 2]/[Key 4] to pick out the specified choice, both “meter” or “yard”. Press [Key 3] to substantiate the choice and return to the earlier web page.
4. Reticle Adjustment
Reticle adjustment refers to aligning the reticle with the purpose of affect at a particular zeroing distance. This ensures that the aiming level of the scope coincides with the purpose of affect at that individual distance.
- Press [Key 2]/[Key 4] to the reticle adjustment choice. Press [Key 3] to enter the sub-menu interface (Fig. 15).
- As soon as contained in the reticle adjustment sub-menu, press [Key 3]/[Key 5] to modify between sub-options and use [Key 2] or [Key 4] to regulate the worth of the corresponding parameter (for detailed directions, please check with the zeroing clarification within the set up steps);
- After choosing your most well-liked settings, you will have two choices to avoid wasting them: 1. Choose “Sure” underneath the Save choice and press [Key 3] to avoid wasting and exit; 2. No matter whether or not “Sure” or “No” is chosen underneath the Save choice, it’s also possible to press and maintain [Key 3] to avoid wasting and exit.
- Set “No” underneath the Save choice and press [Key 3] to exit with out saving
5. Gyroscope
This operate permits for sensing the place standing of the machine, displaying and calibrating its yaw and pitch angles.
- Press [Key 2]/[Key 4] to maneuver the cursor to the gyroscope choice, and press [Key 3] to enter the sub-menu.
- Press [Key 2]/[Key 4] to pick out “Show” or “Calibration”, after which press [Key 3] to enter the chosen choice.
- Within the “Show” choice, select whether or not to show the yaw and pitch angle on the house display. Press [Key 2]/[Key 4] to pick out “Off” or “On” and press [Key 3] to avoid wasting and return to the menu.
- “Calibration” represents getting into the calibration state. Please place the machine on a horizontal aircraft floor, and press [Key 3] to carry out automated calibration. After calibration, the machine will mechanically return to the house display.
6. Image In Image (PIP)
The highest heart of the show can present a 2x magnified image for enhanced aiming visibility. This lets you see magnified goal particulars with out sacrificing the sector of view.
7. Default Magnification
This operate means that you can choose the default magnification stage of the evening imaginative and prescient spectrum channel when the machine is powered on.
- Press [Key 2]/[Key 4] to the default magnification choice. Press [Key 3] to enter the sub-menu interface.
- Choose the specified default magnification, click on [Key 3] to avoid wasting and return to the menu.
8. Default Colour
This operate means that you can choose the default shade mode for the evening imaginative and prescient spectrum of this machine. There are two choices obtainable: shade and black&white mode.
- Press [Key 2]/[Key 4] to the default shade choice. Press [Key 3] to enter the sub-menu interface.
- Choose the specified default shade, click on [Key 3] to avoid wasting and return to the menu.
9. Brightness of IR
This operate means that you can regulate the brightness of IR illuminator.
- Press [Key 2]/[Key 4] to the brightness of IR choice. Press [Key 3] to enter the sub-menu interface;
- Press [Key 2]/[Key 4] to pick out amongst “Off”, “1”, “2”,”3”choice after which press [Key 3] to avoid wasting and return to the earlier web page.
10. Recoil-activated recording
When the machine detects recoil, all the taking pictures course of can be recorded in 20-second intervals. Every 20-second phase of the taking pictures occasion can be saved on the TF card.
- Press [Key 2]/[Key 4] to the recoil-activated choice. Press [Key 3] to enter the sub-menu;
- Press [Key 2]/[Key 4] to pick out from “OFF”, “ON” and “Influence Sensitivity” choices;
- As soon as choosing from “Off” or “On”, press [Key 3] to avoid wasting and return to the earlier web page.
- After choosing “Influence Sensitivity”, press [Key 3] to enter the sub-option of sensitivity stage. Press [Key 2]/[Key 4] to pick out “Off”, “Low”, “Medium” or “Excessive” mode. Press [Key 3] to avoid wasting and return to the earlier web page.
11. Auto Energy Off
When this operate is enabled, the machine will detect the final button operation as the place to begin and execute the auto power-off command primarily based on the set shutdown period. This setting can be retained and proceed after the subsequent power-on.
- Press [Key 2]/[Key 4] to maneuver the cursor to pick out the auto energy off setting, and press [Key 1] to enter the submenu.
- Press [Key 2]/[Key 4] to pick out “Off”, “1 Min”, “2 Min”, “3Min”, “5 Min”, “10 Min” or “30 Min” period choices. After choice, press [Key 3] to substantiate and save, and return to the earlier web page.
12. Auto Recording
As soon as this operate is enabled, the machine will provoke automated recording and proceed this operation after the subsequent power-on.
- Press [Key 2]/[Key 4] to the auto recording choice. Press [Key 3] to enter the sub-menu.
- Press [Key 2]/[Key 4] to pick out “Off” or “On” choices, after which press [Key 3] to avoid wasting and return to the earlier web page.
13. Loop Recording
Customers can customise the phase recording period by accessing the loop recording settings. When the reminiscence card reaches its full capability, new recordings will mechanically overwrite the beforehand saved recordsdata. Choosing “Off” will cease recording when the reminiscence card is full, and the oldest video file is not going to be overwritten.
- Press [Key 2]/[Key 4] to the loop recording choice. Press [Key 3] to enter the sub-menu.
- Press [Key 2]/[Key 4] to pick out “Off”, “1 Min”, “3 Min”, “5 Min” or “10 Min” after which press [Key 3] to avoid wasting and return to the earlier web page.
14. Date Stamp
Customers can customise the show of a time stamp within the decrease proper nook of captured images and movies.
- Press [Key 2]/[Key 4] to the date stamp choice. Press [Key 3] to enter the sub-menu;
- Press [Key 2]/[Key 4] to pick out “Off” or “On” choices, after which press [Key 3] to avoid wasting and return to the earlier web page.
15. Report Audio
Person can select whether or not to file audio together with the video.
- Press [Key 2]/[Key 4] to the file audio choice. Press [Key 3] to enter the sub-menu;
- Press [Key 2]/[Key 4] to pick out “Off” or “On” choices, after which press [Key 3] to avoid wasting and return to the earlier web page.
16. WiFi
Person can select whether or not to file audio together with the video.
By means of the WiFi connection, you should use your telephone, PC or pill as an exterior viewfinder enabling customers to synchronously see the images and movies on a bigger display.
- Press [Key 2]/[Key 4] to the WiFi choice. Press [Key 3] to enter the sub-menu;
- Press [Key 2]/[Key 4] to pick out “Off” or “On” choices. Select “Off” and press [Key 3] to avoid wasting and return to the earlier web page. Choose “On” to allow Wi-Fi and return to the house display.
Steps to connect with your cell machine:
- Obtain “PardVision” from the Apple App Retailer or the Google Play Retailer.
- Allow Wi-Fi on each your machine and your cell machine.
- Seek for the Wi-Fi community in your cell machine (the machine Wi-Fi community is a string of characters beginning with PARD, which is a novel string of numbers). Please enter the password: 12345678 to attach.
- Enter the applying to function and use. Notice: After nabling Wi-Fi, you can not entry the menu. Press and maintain [Key 4] to disable the Wi-Fi after which enter the menu interfac.
17. Publicity
Customers can select their most well-liked publicity settings.
- Press [Key 2]/[Key 4] to the publicity choice. Press [Key 3] to enter the sub-menu;
- Use [Key 2]/[Key 4] to pick out your most well-liked choice, after which press [Key 3] to avoid wasting and return to the earlier web page.
18. Language
- Customers can select their most well-liked language.
- Press [Key 2]/[Key 4] to the language choice. Press [Key 3] to enter the sub-menu;
- Press [Key 2]/[Key 4]to your most well-liked language after which press [Key 3] to avoid wasting and return to the earlier web page.
19. Date/Time
- Customers can set the system date and time of the machine.
- Press [Key 2]/[Key 4] to the date/time choice. Press [Key 3] to enter the sub-menu;
- Press [Key 2]/[Key 4] to regulate the date and time worth, after which press [Key 3] to modify choices. Press [Key 5] to return to the earlier web page.
20. Format
Please notice that reformatting the TF Card will completely delete all knowledge, and it can’t be recovered. Please function
with warning!
- Press [Key 2]/[Key 4] to the format choice. Press [Key 3] to enter the sub-menu;
- Press [Key 2]/[Key 4] to pick out “Cancel” or “OK” choice. After choice, press [Key 3] to substantiate the related operation and return to the earlier web page.
21. Default Setting
Resetting the machine will restore it to the manufacturing unit default ettings, deleting all person knowledge and personalised settings. Proceed with warning when performing this operation!
- Press [Key 2]/[Key 4] to the default setting choice. Press [Key 3] to enter the sub-menu;
- Press [Key 2]/[Key 4] to pick out “Cancel” or “OK” choice. After choice, press [Key 3] to substantiate the related operation and return to the earlier web page.
22. Model
This operate shows the machine’s model.
- Press [Key 2]/[Key 4] to the model choice. Press [Key 3] to enter the sub-menu;
- Press [Key 3] once more to return to the earlier web page.
FCC WARNING
This machine complies with half 15 of the FCC Guidelines. Operation is topic to the next two circumstances:
(1) This machine could not trigger dangerous interference, and
(2) this machine should settle for any interference acquired, together with interference that will trigger undesired operation.
Notice: This gear has been examined and located to adjust to the boundaries for a Class B digital machine, pursuant to half 15 of the FCC Guidelines. These limits are designed to supply cheap safety in opposition to dangerous interference in a residential set up. This gear generates, makes use of and may radiate radio frequency power and, if not put in and utilized in accordance with the directions, could trigger dangerous interference to radio communications. Nevertheless, there isn’t any assure that interference is not going to happen in a selected set up. If this gear does trigger dangerous interference to radio or tv reception, which might be decided by turning the gear on and off, the person is inspired to attempt to appropriate the interference by a number of of the next measures:
-Reorient or relocate the receiving antenna.
-Improve the separation between the gear and receiver.
-Join the gear into an outlet on a circuit totally different from that to which the receiver is linked.
-Seek the advice of the vendor or an skilled radio/TV technician for assist.
Notice: The Grantee just isn’t accountable for any adjustments or modifications not expressly authorized by the celebration accountable for compliance. such modifications might void the person’s authority to function the gear. The machine has been evaluated to fulfill basic RF publicity requirement. This gear complies with FCC’s RF radiation publicity limits set forth for an uncontrolled surroundings. This machine and its antenna(s) should not be co-located or conjunction with every other antenna or transmitter.
Trending Merchandise


